
Introduction
A well-deserved twist on the classic Chicken Caesar, the Crispy Chicken Caesar Sandwich combines savory flavors with satisfying crunch. This sandwich is not just an ordinary meal; it’s a culinary experience that transforms simple ingredients into an unforgettable dish.
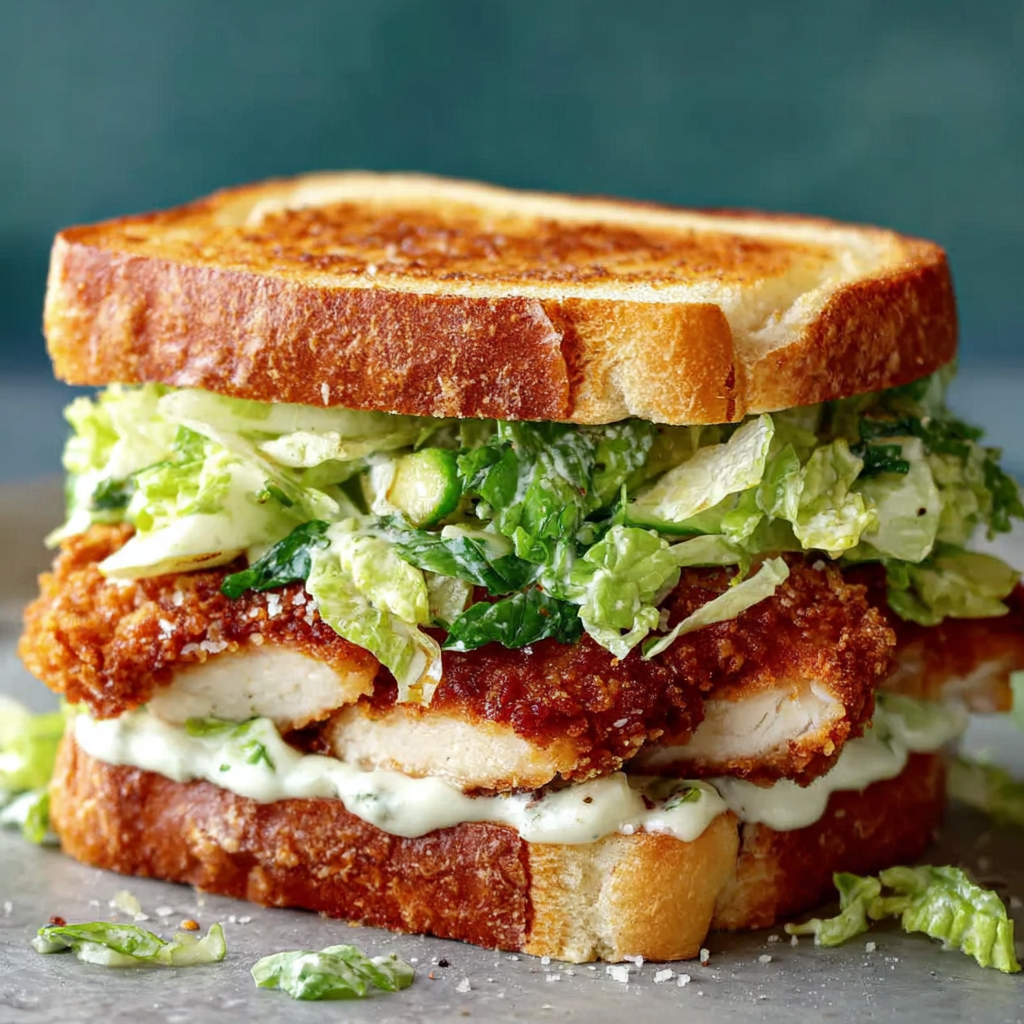
Imagine biting into a golden-brown chicken breast nestled between fresh romaine lettuce and creamy Caesar dressing, all tucked into crispy bread. This sandwich is a celebration of textures and flavors that excite the palate, making it perfect for lunch or a delightful dinner.
As you prepare this recipe, you'll discover how each element works in harmony, creating layers of taste that will leave you craving more. Preparing this dish at home means you can control the ingredients and adjust flavors to suit your taste.
Ingredients
- 2 boneless, skinless chicken breasts
The chicken is the star of the sandwich. When breaded and fried, it becomes crispy on the outside while remaining juicy inside, providing a satisfying bite. - 1 cup breadcrumbs
Breadcrumbs create the crunchy exterior on the chicken. Using panko breadcrumbs can elevate the texture, giving the sandwich an extra crispy finish. - 1/2 cup all-purpose flour
Flour acts as the initial coating for the chicken, helping the eggs stick and ensuring that the breadcrumbs adhere properly. - 2 large eggs
Eggs serve as a binding agent, helping the breadcrumbs stick to the chicken. Their protein also contributes to browning during frying. - 2 tablespoons olive oil
Olive oil is essential for frying the chicken, helping to achieve a golden, crispy texture while adding richness. - 4 slices of crusty bread
The bread forms the base of the sandwich. A crusty loaf holds up well to the fillings and adds its own crunch. - 1 cup romaine lettuce, chopped
Romaine brings freshness and crunch to the sandwich, balancing the crispy chicken and rich dressing. - 1/2 cup Caesar dressing
The dressing adds creaminess and flavor to the sandwich, enhancing the classic Caesar taste that complements the chicken perfectly. - 1/4 cup grated Parmesan cheese
Parmesan adds a savory, umami flavor to the sandwich; its nuttiness pairs wonderfully with the chicken and dressing. - Salt and pepper, to taste
Seasoning the chicken before cooking ensures a flavorful bite, enhancing all the components of the sandwich.
Directions & Preparation
Step 1: Prepare the chicken breasts.
Start by patting the chicken breasts dry with paper towels; moisture can prevent browning. Season them with salt and pepper on both sides for enhanced flavor. This step is crucial for achieving a crisp exterior during frying.
Step 2: Set up the breading station.
In three separate bowls, place the flour, beaten eggs, and breadcrumbs. This setup makes it easy to coat the chicken evenly. Be sure to keep one hand for wet ingredients and the other for dry to avoid clumping.
Step 3: Bread the chicken breasts.
Dredge each seasoned chicken breast in flour, shaking off excess, then dip into the egg, and finally coat with breadcrumbs. Press the breadcrumbs onto the chicken to ensure a thick, crispy layer. This layering is essential for optimal crunch.
Step 4: Heat the olive oil.
In a large skillet over medium heat, heat the olive oil until shimmering but not smoking. This is the ideal temperature for frying the chicken, allowing it to become golden brown without burning.
Step 5: Fry the chicken breasts.
Add the breaded chicken to the skillet and cook for about 5 to 7 minutes per side, or until cooked through and crispy. Avoid overcrowding the pan to ensure proper frying; this gives each piece enough space to crisp up beautifully.
Step 6: Drain the fried chicken.
Once golden brown, transfer the chicken to a paper towel-lined plate to drain excess oil. This helps maintain crispness and prevents the sandwich from becoming soggy.
Step 7: Toast the bread.
While the chicken drains, toast the bread slices in the same skillet or a toaster until golden. Toasting the bread adds an extra layer of crunch and creates a better structure for the sandwich.
Step 8: Assemble the sandwich.
On one slice of toasted bread, layer the fried chicken, chopped romaine, Caesar dressing, and Parmesan cheese. Top with another slice of bread. Assembling the sandwich correctly ensures that every bite captures all the delicious flavors.
Step 9: Slice and serve the sandwich.
Carefully cut the sandwich in half for easier handling and to showcase the layers. This not only makes it visually appealing but also enhances the eating experience, allowing for balanced bites.

Choosing the Right Bread
For the Crispy Chicken Caesar Sandwich, the choice of bread can significantly impact the overall texture and flavor. Opt for thick slices of crusty bread such as ciabatta or a sturdy sourdough. These varieties hold up well against the moisture of the dressing and the juiciness of the fried chicken, ensuring a satisfying crunch with every bite.
Enhancing the Caesar Flavor
To elevate the Caesar dressing's flavor, consider adding a few extra touches. Incorporating minced garlic or a squeeze of fresh lemon juice can brighten the dish and deepen the flavor profile. You can also sprinkle some fresh herbs, like basil or parsley, for a refreshing twist. These subtle enhancements complement the traditional Caesar elements wonderfully.
Serving Suggestions
While the Crispy Chicken Caesar Sandwich is a stand-alone delight, pairing it with crispy baked fries or a fresh side salad can make for a balanced meal. A light vegetable medley or a classic potato salad can also provide an excellent contrast to the sandwich's crunchiness, making each mouthful a delightful experience.
FAQs
What if my chicken isn't crispy enough?
Ensure the chicken is adequately coated in breadcrumbs and avoid overcrowding the skillet while frying, which can lower the oil temperature.
Can I use grilled chicken instead of fried?
Absolutely! Grilled chicken adds a smoky flavor, but will lack the signature crunch. Consider adding crispy bacon to compensate for texture.
Why is my bread soggy?
If the sandwich sits too long before serving, the dressing can soak into the bread. Assemble just before eating to keep it crisp.
How can I make my sandwich spicier?
Adding sliced jalapeños, red pepper flakes to the chicken, or using spicy Caesar dressing can up the heat and complement the flavors nicely.
Can I make variations for dietary preferences?
Yes, consider using gluten-free breadcrumbs and bread or grilled chicken for a lighter version while keeping the dressing intact.
What toppings pair well with this sandwich?
Sliced avocado or crispy bacon can add complexity and richness, making the sandwich even more satisfying.
Conclusion
The Crispy Chicken Caesar Sandwich is a revelatory take on a beloved classic, perfectly marrying crunchy and creamy elements. Each bite offers a delightful balance of flavors that can easily transform a simple meal into something spectacular.
Experiment with the ingredients and elevate your sandwich to suit your taste profile: whether it’s adding more crunch, fresh herbs, or complementary toppings. You'll find that this dish not only satisfies but also invites creativity in the kitchen.
Recipe Card
Crispy Chicken Caesar Sandwich – Crunchy & Flavorful
Ingredients
Method
- Prepare the chicken breasts.
- Set up the breading station.
- Bread the chicken breasts.
- Heat the olive oil.
- Fry the chicken breasts.
- Drain the fried chicken.
- Toast the bread.
- Assemble the sandwich.
- Slice and serve the sandwich.
Notes
Additional serving suggestions: pair with a crisp salad, garlic bread, or roasted seasonal vegetables for balance.
For make-ahead, prep components separately and assemble just before heating to preserve texture.
Taste and adjust with acid (lemon/vinegar) and salt right at the end to wake up flavors.


