Introduction
There's something undeniably satisfying about a crispy chicken sandwich, and when you elevate it with delicious Caesar flavors, it becomes an irresistible meal. The combination of crunchy textures and bold tastes makes for a sandwich that stands out.
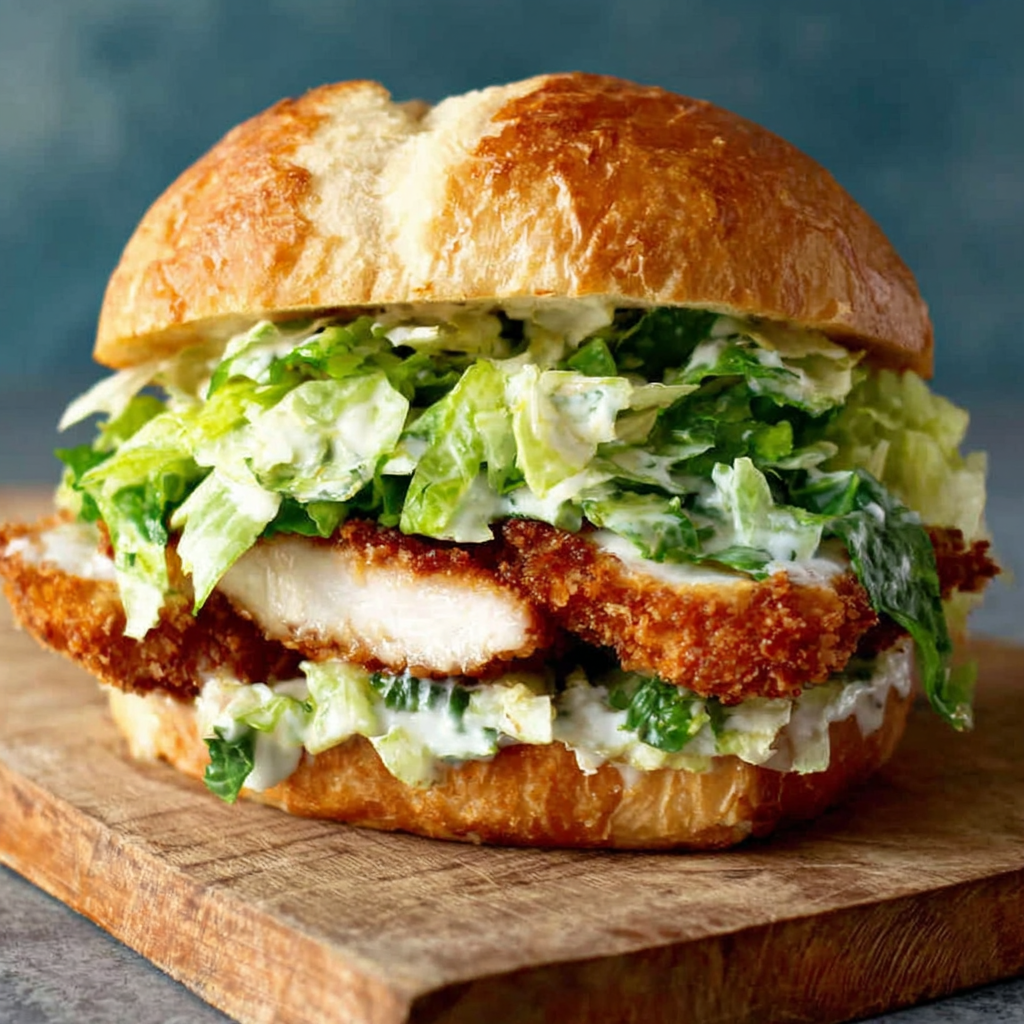
Perfect for a weekend lunch or a quick dinner, this Crispy Chicken Caesar Sandwich encompasses everything we love about classic Caesar salad, wrapped in the convenience of a handheld delight. Each bite offers a symphony of crispy chicken, creamy dressing, and fresh greens.
Ingredients
- 4 boneless, skinless chicken breasts
Chicken breasts are the star of this sandwich, offering a lean source of protein. They're perfect for achieving that satisfying crispy texture when breaded and fried. - 1 cup buttermilk
Buttermilk is key for marinating the chicken, providing moisture and tenderness while also helping the breading adhere better and enhance flavor. - 2 cups panko breadcrumbs
Panko breadcrumbs are larger and flakier than regular breadcrumbs, giving the chicken an extra crispy exterior that holds up wonderfully in the sandwich. - 1/2 cup all-purpose flour
The flour acts as a binding agent, helping the buttermilk and panko to create a crisp coating around the chicken that is golden brown and flavorful. - 1 teaspoon garlic powder
Garlic powder enhances the overall flavor profile of the breading, infusing each bite with savory goodness. - 1 teaspoon salt
Salt not only seasons the chicken but also helps draw out moisture, ensuring a juicy end result. - 1/2 teaspoon black pepper
Black pepper adds a subtle heat and depth of flavor that complements the other seasoning ingredients. - 1 cup romaine lettuce, chopped
Fresh romaine adds a crisp, refreshing crunch to the sandwich, balancing the richness of the crispy chicken and Caesar dressing. - 1/2 cup Caesar dressing
Caesar dressing adds creaminess and tang, elevating the flavor profile and making the sandwich feel indulgent. - 4 ciabatta rolls or burger buns
Sturdy buns are essential for holding all the filling without becoming soggy, providing the perfect vessel for this delicious sandwich. - Parmesan cheese, grated (for garnish)
Parmesan cheese adds a salty, nutty flavor and a gourmet touch, enhancing the classic Caesar profile of the sandwich.
Directions & Preparation
Step 1: Marinate the chicken
Begin by soaking the chicken breasts in buttermilk for at least 1 hour or overnight. This marination is essential for tenderizing the meat and allows the flavors to meld, making the chicken flavorful and juicy during cooking.
Step 2: Prepare the breading station
Set up a breading station with one bowl containing seasoned flour (mix the flour, garlic powder, salt, and pepper) and another bowl with panko breadcrumbs. This organized setup speeds up the breading process and ensures even coating on the chicken.
Step 3: Bread the chicken
Once marinated, take each chicken breast and dredge it in the flour mixture, ensuring an even coating. Shake off any excess flour before dipping into the panko breadcrumbs, pressing down slightly to ensure they adhere well. This two-step process is key for achieving maximum crunch.
Step 4: Fry the chicken
Heat oil in a deep skillet over medium heat. Once hot, carefully place the breaded chicken into the oil and fry until golden brown and cooked through (about 4-5 minutes per side). This method allows for a beautiful crispy coating while keeping the interiors moist and flavorful.
Step 5: Prepare the buns
While the chicken is frying, you can toast the ciabatta rolls or burger buns until lightly golden. Toasting the buns prevents them from getting soggy and adds a nice texture that complements the crispy chicken.
Step 6: Assemble the sandwich
Once the chicken is cooked and the buns are toasted, layer each bun with a generous amount of chopped romaine, place the crispy chicken on top, and drizzle with Caesar dressing. This combination showcases the fresh, crunchy salad elements with the rich flavors of the sandwich.
Step 7: Finish with cheese
Top each sandwich with a sprinkle of grated Parmesan cheese for a burst of flavor that ties the entire sandwich together. This step is essential for that authentic Caesar taste and adds visual appeal.
Step 8: Serve immediately
Enjoy the sandwiches while they are hot, allowing the crispy texture to shine. Serve with a side of your favorite chips or a simple salad to round out the meal. Eating them fresh ensures the best experience with every crunchy bite.

Why Marinade Matters for Chicken
Marinating chicken is a crucial step that transforms the texture and flavor of the meat. Buttermilk, a staple in southern cooking, breaks down protein fibers, making the chicken tender and juicy. Not only does it enhance moisture, but the tanginess of buttermilk pairs excellently with savory ingredients, ensuring that each bite is flavorful and satisfying.
The Secret to Extra Crispy Breading
Achieving that sought-after crunch when frying chicken is often in the technique of breading. Panko breadcrumbs provide a light and airy texture, especially when deep-fried, resulting in a satisfying crunch. Additionally, the double-dredging process—flour first, then panko—ensures a robust, crisp coating that holds up against the condiments and toppings.
Customizing Your Caesar Sandwich
While the classic Caesar flavors shine through in this sandwich, there’s room for creativity. You can introduce additional toppings such as avocado for creaminess, or sun-dried tomatoes for a burst of sweetness. Exploring different greens or even pickled vegetables can also add an interesting twist while maintaining that crunch and flavorful impact.
FAQs
What should I do if my chicken coating is soggy?
Ensure that the oil is hot enough before adding the chicken; it should sizzle upon contact. Additionally, avoid overcrowding the pan, as this can lower the oil temperature.
Can I use chicken thighs instead?
Yes, chicken thighs can be used for a juicier bite. Just adjust the cooking time to ensure they are cooked through.
How do I ensure the chicken is completely cooked?
Using a meat thermometer, ensure the internal temperature reaches 165°F. This ensures safety and optimal juiciness.
What if my Caesar dressing is too thick?
You can thin it out by adding a small amount of water or extra lemon juice to reach your desired consistency.
Can I use whole wheat buns for a healthier option?
Absolutely! Whole wheat buns can add a nutty flavor and extra fiber to your sandwich.
How do I prevent my chicken from overcooking?
Keep an eye on the color; once the chicken is a deep golden brown, it’s likely done. Also, resting it for a few minutes post-frying helps retain moisture.
Conclusion
The Crispy Chicken Caesar Sandwich is not only a delight for your taste buds but also a fun project in the kitchen. Each ingredient plays a vital role in creating a balanced dish that can satisfy both hurried weeknights and leisurely weekends.
Take this recipe as a base to unleash your culinary creativity, swapping in different ingredients or adding personal touches. Enjoy every crunchy, flavorful bite, and share the experience with friends or family for a meal that's sure to impress.
Recipe Card

Crispy Chicken Caesar Sandwich – Crunchy & Flavorful
Ingredients
Method
- Marinate the chicken
- Prepare the breading station
- Bread the chicken
- Fry the chicken
- Prepare the buns
- Assemble the sandwich
- Finish with cheese
- Serve immediately
Notes
Additional serving suggestions: pair with a crisp salad, garlic bread, or roasted seasonal vegetables for balance.
For make-ahead, prep components separately and assemble just before heating to preserve texture.
Taste and adjust with acid (lemon/vinegar) and salt right at the end to wake up flavors.


