
Introduction
The Cookie Monster Cake is a delightful dessert that captivates the hearts of both children and adults. Inspired by the beloved Sesame Street character, this cake combines rich flavors and whimsical aesthetics that make it perfect for celebrations or casual gatherings.
Layered with cookie-infused batter and decorated with vibrant blue frosting, this cake is not just a feast for the eyes; it delivers on taste and texture as well. Imagine the fusion of classic chocolate chip cookies and moist cake layers coming together in one harmonious treat.
Ingredients
- 2 cups all-purpose flour
This is the foundation of the cake, providing structure and stability to each layer. The gluten formed during mixing helps the cake retain its shape and support the frosting. - 1 ½ cups granulated sugar
Sugar adds sweetness and contributes to the cake’s moistness by helping to trap water in the batter. It also promotes browning during baking, enhancing the cake's flavor. - ½ cup unsalted butter, softened
Butter not only enriches the cake's flavor but also contributes to its tenderness. It works in conjunction with sugar to create a creamy mixture that improves the cake's texture. - 1 cup brown sugar, packed
The brown sugar adds a deeper, caramel-like flavor to the cake and helps retain moisture, resulting in a denser and more flavorful crumb. - 4 large eggs
Eggs bind the ingredients together and help the cake rise, contributing to its fluffy texture. They also add richness and enhance the overall flavor. - 1 cup whole milk
Milk adds moisture and richness, providing the cake with a velvety crumb. It also helps to activate the baking powder for proper leavening. - 1 tablespoon vanilla extract
Vanilla enhances the sweetness and flavor profile of the cake, giving it a homey, comforting taste that complements the cookie elements. - 1 tablespoon baking powder
This leavening agent is crucial for making the cake rise, creating a lighter texture. It works by producing carbon dioxide bubbles during baking. - ½ teaspoon salt
Salt balances the sweetness and enhances the overall flavor of the cake. It also strengthens the gluten in the flour, contributing to a better cake structure. - 1 cup mini chocolate chips
These add delicious bursts of chocolate in every bite, enhancing the cookie-inspired flavor and texture of the cake. - 2 cups buttercream frosting (colored blue)
This is the key decorative element that brings the cake to life. It not only adorns the cake but also adds a sweet, creamy flavor that complements the cookie layers. - Cookie crumbles (for decoration)
Using crumbled cookies as a topping adds texture and reinforces the dessert's cookie theme, playing into the visual aspect that appeals to the Cookie Monster aesthetics.
Directions & Preparation
Step 1: Preheat the oven to 350°F (175°C) and prepare your cake pans.
Preheating the oven is essential, ensuring that your cake begins baking at the right temperature for proper rising. Greasing the pans helps prevent sticking, allowing for easy removal. This step sets the foundation for a successful bake.
Step 2: In a large mixing bowl, cream together the softened butter, granulated sugar, and brown sugar until light and fluffy.
Creaming the butter and sugars aerates the mixture, incorporating air that helps the cake rise during baking. It's essential to achieve a light color and airy texture, indicating that the sugars have dissolved properly.
Step 3: Add the eggs, one at a time, beating well after each addition. Mix in the vanilla extract.
Adding the eggs gradually ensures they incorporate smoothly, making for a more homogenous batter. This step contributes to the cake’s moisture and richness, enhancing its overall flavor.
Step 4: In a separate bowl, whisk together the flour, baking powder, and salt.
Whisking these dry ingredients together ensures an even distribution of the leavening agent and salt, preventing any parts of the cake from being too salty or not rising properly. This creates a balanced cake that rises uniformly.
Step 5: Gradually add the dry ingredients to the wet mixture, alternating with the milk, starting and ending with the flour. Mix until just combined.
Alternating between dry and wet ingredients prevents over-mixing, which can lead to a tough cake. This folding technique keeps the batter light and airy, which is vital for a tender crumb.
Step 6: Gently fold in the mini chocolate chips until evenly distributed throughout the batter.
Folding in the chocolate chips last ensures that they are evenly dispersed without overworking the batter. This way, you get delightful chocolate bites in nearly every bite of cake.
Step 7: Divide the batter evenly between the prepared cake pans and smooth the tops.
Evenly distributing the batter fuels an even bake, which is crucial for stacking the layers later. Smoothing the tops helps ensure that they rise evenly and can be layered without any unevenness.
Step 8: Bake in the preheated oven for 25-30 minutes or until a toothpick inserted in the center comes out clean.
Checking for doneness with a toothpick helps ensure your cake is fully baked. Overbaking can lead to dry layers, so the toothpick method provides a reliable cue.
Step 9: Once baked, allow the cakes to cool in the pans for 10 minutes before transferring them to a wire rack to cool completely.
Letting the cakes cool slightly in the pans allows them to set and makes for easier removal. Cooling completely on a wire rack prevents sogginess and maintains the cake texture.
Step 10: While the cake cools, prepare the blue buttercream frosting.
Making the frosting while the cake cools keeps your workflow efficient. A well-aerated, creamy frosting will decorate your cake flawlessly, enhancing its visual appeal and flavor.
Step 11: Once the cakes are completely cool, frost the top of one layer, place the second layer on top, and frost the top and sides of the entire cake.
Frosting the layers helps keep them moist and adds flavor. The final coating of frosting creates an inviting appearance, making it irresistibly delightful for guests.
Step 12: Decorate the cake with cookie crumbles on the top and around the sides for added texture and fun.
Adding cookie crumbles ties the visual elements of the cake to its name. It provides a contrasting texture against the smooth frosting, enhancing the overall eating experience.

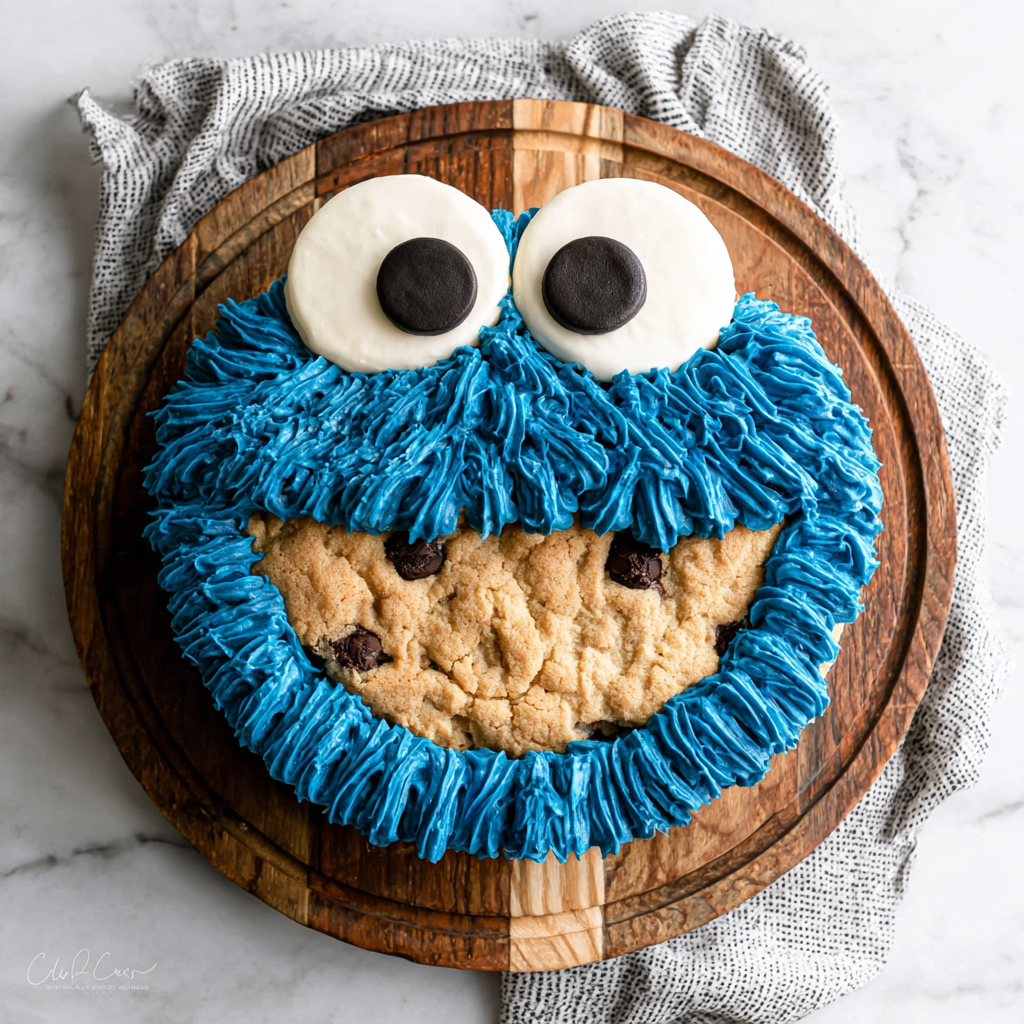
A Dazzling Blue Decor: The Art of Frosting
The vibrant blue frosting is a signature aspect of the Cookie Monster Cake. Executing an even coat not only makes a stunning visual statement but also adds a creamy, sweet flavor that balances the cake perfectly. Using a spatula or piping bag can help create intricate designs that elevate the cake's presentation for special occasions.
Why Cookie Crumbles Matter
The addition of cookie crumbles is not merely aesthetic; it also enriches the cake's flavor profile. Each bite delivers a satisfying crunch, contrasting with the softness of the cake layers. This finishing touch provides a nostalgic connection to cookies, making the dessert feel playful and indulgent.
Incorporating Extra Cookie Flavors
For those who want to enhance the cookie theme, consider using different cookie varieties in the layers or topping. Crushed Oreo, chocolate chip, or even peanut butter cookies can introduce delightful flavor twists, making each bite unique. This flexibility allows you to customize the cake according to personal preference or seasonal inspirations.
FAQs
What if my cake layers have domed tops?
If your cake layers dome, try leveling them with a serrated knife once they’ve cooled. You can also adjust your oven temperature in future bakes to prevent over-rising.
Can I use flavored buttercream for a twist?
Absolutely! Incorporating flavors like almond, lemon, or even espresso can create a unique twist to the traditional Cookie Monster Cake, elevating the taste experience.
What should I do if my frosting is too thin?
If your frosting is too thin, you can add more powdered sugar gradually until you reach your desired consistency. Be careful not to overdo it.
Can I make a smaller version of this cake?
Yes, you can halve the ingredients to create a smaller cake. Just ensure to adjust the baking time accordingly, as smaller cakes will bake faster.
Why did my cake turn out dry?
Dryness can result from overbaking or using the wrong oven temperature. Always check for doneness earlier than suggested and use an oven thermometer to confirm accuracy.
What can I do if my cake doesn’t rise well?
If your cake didn’t rise properly, ensure your baking powder is fresh and that you didn’t overmix the batter, which can lead to dense cakes.
Conclusion
The Cookie Monster Cake is a playful and delicious dessert that is sure to impress. Its unique flavor profile and eye-catching design make it a must-try for any occasion, whether it's a birthday celebration or just a fun family treat.
Baking this cake is not just about satisfying your sweet tooth; it's about creating joyful memories around the table. Embrace the process, gather your loved ones, and indulge in the whimsical tastes of your labor. Happy baking!
Recipe Card
Baking the Irresistible Cookie Monster Cake
Ingredients
Method
- Preheat the oven to 350°F (175°C) and prepare your cake pans.
- In a large mixing bowl, cream together the softened butter, granulated sugar, and brown sugar until light and fluffy.
- Add the eggs, one at a time, beating well after each addition. Mix in the vanilla extract.
- In a separate bowl, whisk together the flour, baking powder, and salt.
- Gradually add the dry ingredients to the wet mixture, alternating with the milk, starting and ending with the flour. Mix until just combined.
- Gently fold in the mini chocolate chips until evenly distributed throughout the batter.
- Divide the batter evenly between the prepared cake pans and smooth the tops.
- Bake in the preheated oven for 25-30 minutes or until a toothpick inserted in the center comes out clean.
- Once baked, allow the cakes to cool in the pans for 10 minutes before transferring them to a wire rack to cool completely.
- While the cake cools, prepare the blue buttercream frosting.
- Once the cakes are completely cool, frost the top of one layer, place the second layer on top, and frost the top and sides of the entire cake.
- Decorate the cake with cookie crumbles on the top and around the sides for added texture and fun.
Notes
Additional serving suggestions: pair with a crisp salad, garlic bread, or roasted seasonal vegetables for balance.
For make-ahead, prep components separately and assemble just before heating to preserve texture.
Taste and adjust with acid (lemon/vinegar) and salt right at the end to wake up flavors.


