Introduction
The holiday season brings with it a sense of nostalgia, especially when it comes to treats that remind us of simpler times. One of those treats is the iconic Little Debbie Christmas Tree Cake, a festive dessert that evokes warm memories of family gatherings and celebrations. But what if we could transform this classic snack into something even more indulgent?
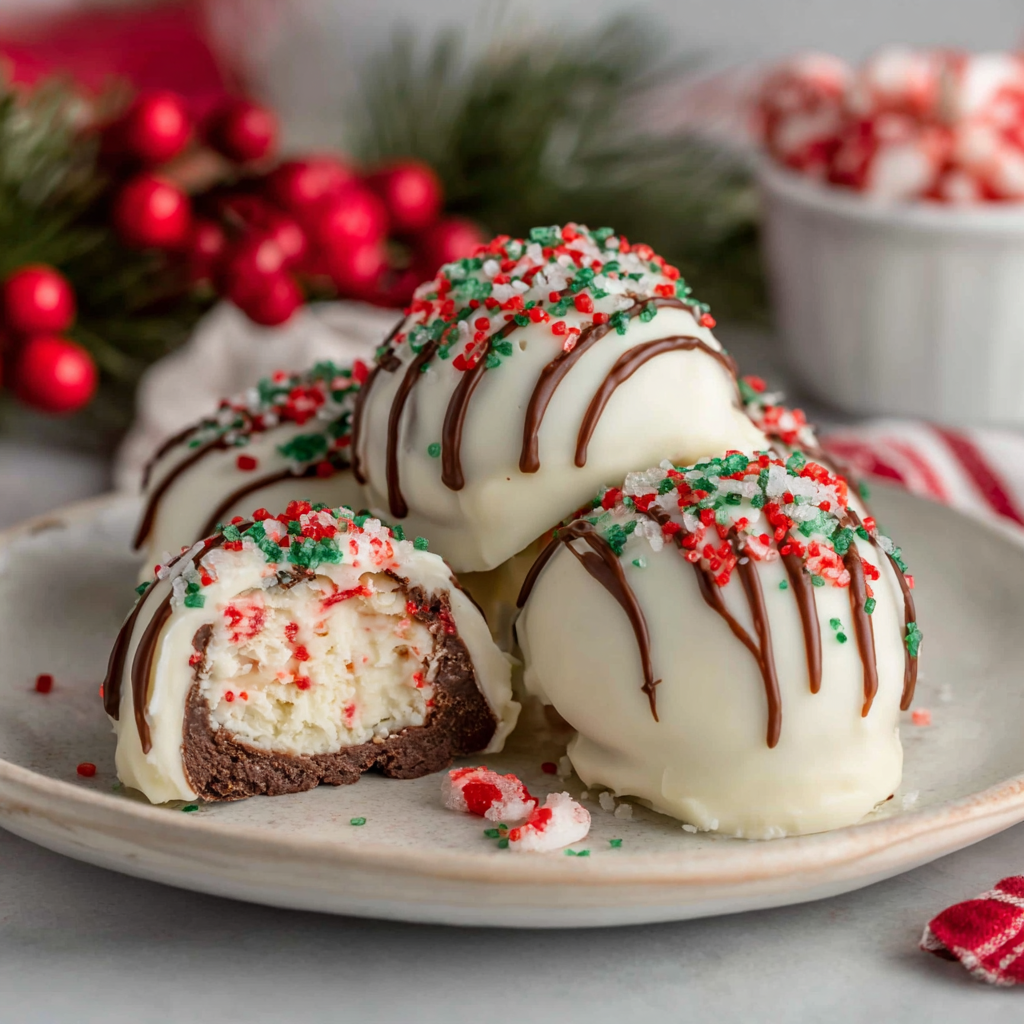
Welcome to the world of Little Debbie Christmas Tree Cake Truffles, where the joyful flavors of the beloved cake are reimagined into delectable bite-sized morsels. These truffles are not only visually appealing with their festive colors but also offer a rich, creamy texture that is simply irresistible. Whether you’re hosting a holiday party or looking for a delightful gift, these truffles are sure to impress.
Ingredients
- 1 package Little Debbie Christmas Tree Cakes (10 cakes)
These iconic cakes are the base of our truffles, providing a blend of moist cake and frosting flavors typical of the holiday season. They set the sweet and festive tone for our truffles. - 4 oz cream cheese, softened
Cream cheese adds richness and a creamy texture to the truffle filling. It also helps to bind the cake crumbs together, making it easier to form into truffle shapes. - 1 cup white chocolate chips
White chocolate is used for coating the truffles, contributing sweetness and a glossy finish. It also enhances the festive appearance of the truffles, mimicking the white icing of the original cake. - 2 tsp vegetable oil
Adding vegetable oil to the melted white chocolate helps to achieve a smooth and pourable consistency. This ensures the chocolate coats the truffles evenly without clumping. - Sprinkles for decoration
Sprinkles add a fun, colorful touch to the truffles, closely resembling the festive appearance of the original cakes. They also provide texture and an extra dimension of sweetness.
Directions & Preparation
Step 1: Crumble the Little Debbie Christmas Tree Cakes into a large bowl.
Begin by breaking apart the cakes into small, fine crumbs. This step is crucial as it creates the foundation for your truffle mixture. The finer the crumbs, the smoother your truffles will be. Make sure to remove any hard edges to ensure even mixing.
Step 2: Add softened cream cheese to the cake crumbs, mixing until well combined.
Incorporating cream cheese with the cake crumbs is essential for binding the truffles together. Use a spatula or your hands to mix thoroughly, ensuring that every crumb is coated with cream cheese. The mixture should be moist but not overly sticky; if it’s too dry, add a little more cream cheese.
Step 3: Form the mixture into small balls, about 1 inch in diameter.
Shaping the mixture into uniform balls is key to achieving a consistent-sized truffle that is appealing and easy to eat. Use your palms to roll them gently, ensuring each ball is compact but not overly tight, which may lead to a dense final product.
Step 4: Place the truffles onto a lined baking sheet and refrigerate for at least 30 minutes to firm up.
Chilling the truffles solidifies their shape and makes them easier to coat with chocolate. This step is crucial because it prevents the truffles from falling apart during the coating process, ensuring you get a neat finish.
Step 5: Melt white chocolate chips and vegetable oil together in a microwave-safe bowl, stirring until smooth.
Gently melting the chocolate ensures it remains smooth and glossy. Stir well to prevent any lumps. The addition of vegetable oil keeps the chocolate fluid for easier dipping, creating a nice coating without thick clumps.
Step 6: Dip each truffle into the melted white chocolate, allowing excess to drip off before placing back on the lined sheet.
Dipping is the point where the truffles truly become a treat. Be sure to coat each one evenly and allow the excess chocolate to drip away. This will create a thin layer of chocolate that enhances the truffle's overall flavor and presentation.
Step 7: Decorate the truffles with sprinkles while the chocolate is still wet.
Adding sprinkles while the chocolate is still soft helps them adhere better, creating a festive look. This step is not only for decoration but also enhances the crunch factor, complementing the creamy truffle interior.
Step 8: Once decorated, allow the chocolate to set at room temperature or in the refrigerator.
Letting the chocolate set properly creates a crisp shell around the soft truffle filling. This contrasting texture is a delightful surprise in every bite. Make sure the truffles are fully set before serving to prevent any mess.

Transforming a Holiday Classic
These truffles pay homage to the Little Debbie Christmas Tree Cakes while offering an enhanced experience through their rich cream cheese filling and chocolate coating. The sweetness of the original cakes shines through, complemented by a smooth truffle texture. It's a nostalgic twist on a favorite treat, making it perfect for sharing during the festive season.
A Fun Activity for Family Gatherings
Making these truffles can be an enjoyable activity for the whole family. Involving loved ones in the process allows for creative expression, especially when it comes to decorating with sprinkles. It transforms baking into a fun bonding experience while creating delicious treats that everyone can enjoy together.
Perfect for Gifting during the Holidays
These truffles not only taste delightful but also make for beautiful gifts. Package them in festive boxes or jars, and they become thoughtful presents for friends, neighbors, or colleagues. With their charming appearance and delightful flavor, they’re sure to bring joy to anyone who receives them.
FAQs
What should I do if my truffle mixture won't hold together?
If your mixture is too crumbly, consider adding a bit more softened cream cheese. This will help bind the ingredients together better.
Can I use milk chocolate instead of white chocolate?
Yes, milk chocolate can be used for coating if you're looking for a different flavor profile. Just be sure to adjust the sweetness if needed.
What if I want to make these truffles larger?
You can certainly make larger truffles, but remember to adjust the chilling time and ensure they are fully coated.
How can I make the chocolate coating more colorful?
You can add colored chocolate melts to your white chocolate before dipping your truffles to create a vibrant look.
What can I do if my melted chocolate is too thick?
If your melted chocolate is too thick, add a teaspoon of vegetable oil or shortening to thin it out for easier dipping.
How can I ensure my truffles stay moist?
Avoid overbaking or overheating your Little Debbie cakes when crumbling them, as this can lead to dryness.
Conclusion
Little Debbie Christmas Tree Cake Truffles are a delightful way to celebrate the holiday season, perfectly blending nostalgia with creativity. Their vibrant appearance and rich flavor make them not only a treat to enjoy but also a fantastic addition to your holiday festivities.
Whether you're sharing them at gatherings or gifting them to friends, these truffles are sure to bring smiles and joy. So, gather your ingredients and let the holiday baking magic begin!
Recipe Card

Delightful Little Debbie Christmas Tree Cake Truffles
Ingredients
Method
- Crumble the Little Debbie Christmas Tree Cakes into a large bowl.
- Add softened cream cheese to the cake crumbs, mixing until well combined.
- Form the mixture into small balls, about 1 inch in diameter.
- Place the truffles onto a lined baking sheet and refrigerate for at least 30 minutes to firm up.
- Melt white chocolate chips and vegetable oil together in a microwave-safe bowl, stirring until smooth.
- Dip each truffle into the melted white chocolate, allowing excess to drip off before placing back on the lined sheet.
- Decorate the truffles with sprinkles while the chocolate is still wet.
- Once decorated, allow the chocolate to set at room temperature or in the refrigerator.
Notes
Additional serving suggestions: pair with a crisp salad, garlic bread, or roasted seasonal vegetables for balance.
For make-ahead, prep components separately and assemble just before heating to preserve texture.
Taste and adjust with acid (lemon/vinegar) and salt right at the end to wake up flavors.


