Introduction
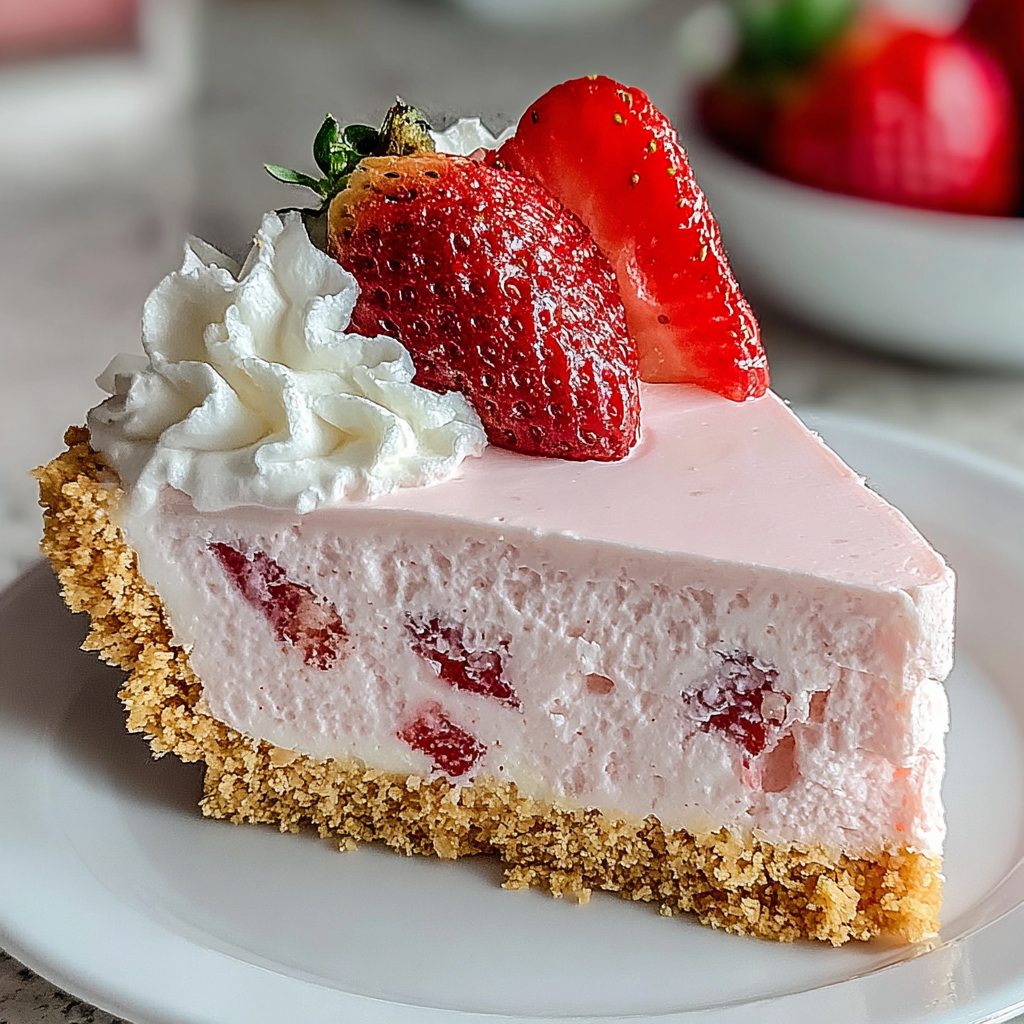
When the warm weather arrives, there's nothing quite as refreshing as a no-bake strawberry cheesecake. This dessert combines the creamy richness of cheesecake with the vibrant sweetness of fresh strawberries, resulting in a treat that's light and utterly satisfying. Best of all, you won't need to turn on your oven, making it perfect for those hot summer days.
This no-bake cheesecake is not only easy to prepare but also allows for some creativity. You can top it with your favorite fruits, a drizzle of chocolate, or a simple whipped cream layer. With just a handful of ingredients and a bit of chill time, you’re on your way to a delightful masterpiece that will impress friends and family alike.
Ingredients
- 8 oz cream cheese
The base of your cheesecake, cream cheese provides a rich and tangy flavor. It gives the cheesecake its characteristic creamy texture, which is crucial for a smooth, satisfying bite. - 1 cup heavy whipping cream
This ingredient contributes to the lightness of the cheesecake. When whipped, it adds volume and a airy texture, making the cheesecake feel less dense. - 1/2 cup powdered sugar
Powdered sugar is used for sweetness and dissolves easily in the cream cheese mixture, ensuring a smooth consistency without any gritty texture. - 1 teaspoon vanilla extract
Vanilla adds a warm flavor that enhances the other ingredients. It enriches the overall taste profile of the cheesecake, contributing to its comforting qualities. - 1 cup fresh strawberries, pureed
The star of this cheesecake, pureed strawberries introduce a vibrant color and fruity sweetness. They also add a natural flavor that pairs beautifully with the creaminess of the cheese. - 1 cup graham cracker crumbs
These crumbs are for the crust, lending a crunchy texture that contrasts with the creaminess of the filling. They also provide a slightly sweet and buttery flavor. - 1/4 cup unsalted butter, melted
Melted butter binds the graham cracker crumbs together and helps create a firm yet crumbly crust. This serves as the base that holds the cheesecake together.
Directions & Preparation
Step 1: Prepare the crust by mixing graham cracker crumbs and melted butter together.
Combining the graham cracker crumbs with melted butter ensures that each crumb is adequately coated, allowing the mixture to stick together. This forms a solid base for your cheesecake once pressed into the baking pan.
Step 2: Press the mixture into a 9-inch springform pan and refrigerate for 15 minutes.
Chilling the crust helps it set firmly, creating a stable foundation for the cheesecake filling. This step is essential to prevent the crust from crumbling when slicing the finished dessert.
Step 3: In a mixing bowl, beat the cream cheese until smooth.
Achieving a smooth consistency for the cream cheese is critical at this stage. Beating it well incorporates air, which contributes to a lighter cheesecake. Make sure there are no lumps to ensure a silky texture.
Step 4: Add in powdered sugar and vanilla extract, continue beating until blended.
Mixing in the powdered sugar and vanilla enhances the sweetness and flavor of the cheesecake filling. Blending these ingredients thoroughly ensures an even distribution of sweetness and flavor.
Step 5: In another bowl, whip the heavy cream until stiff peaks form.
Whipping the heavy cream to stiff peaks incorporates air, giving the cheesecake a light and airy texture. This step is crucial; the whipped cream will provide the necessary lift to the cheesecake while keeping it fluffy.
Step 6: Gently fold the whipped cream into the cream cheese mixture until combined.
Folding the whipped cream ensures you retain the airiness created by whipping. This mix should be handled with care to avoid deflating the cream, as a fluffy texture is key to a delightful cheesecake.
Step 7: Stir in the strawberry puree until mixed well.
Incorporating the strawberry puree not only offers vibrant color but imbues the cheesecake with fresh flavor. Mix gently to avoid losing the airiness you've achieved while still ensuring the strawberries are evenly distributed.
Step 8: Pour the filling into the prepared crust and smooth the top.
Smoothing the top of the cheesecake helps create a visually pleasing dessert. Ensuring an even filling distributes flavors uniformly, resulting in a satisfying slice for everyone.
Step 9: Refrigerate the cheesecake for at least 4 hours, or until set.
Chilling is crucial as it allows the cheesecake to firm up. This time also helps the flavors meld together, creating a more delicious final product. Be patient, as the waiting will be worth it.
Step 10: Serve with additional strawberries or whipped cream if desired.
Adding extra strawberries or whipped cream not only enhances the presentation but also accentuates the flavors. Fresh fruit adds a touch of color and freshness, making each slice even more inviting.

Fresh Strawberries: The Key Component
Fresh strawberries are not just a topping; they are the heart of this dessert. Their natural sweetness and slight tartness provide a beautiful balance to the rich and creamy nature of the cheesecake. For the best flavor, choose ripe, in-season strawberries, as they have the most vibrant taste.
Selecting the Best Cream Cheese
When making cheesecake, the cream cheese quality significantly influences the final outcome. Opt for a full-fat cream cheese for the richest and most velvety texture. Avoid low-fat options, as they can lead to a cheesecake that lacks creaminess and flavor depth.
Variations to Personalize Your Cheesecake
This no-bake strawberry cheesecake can serve as a base for various flavors! Experiment with different fruit purees, such as mango or raspberry, or swirl in melted chocolate for a chocolate-strawberry combination. Creating variations keeps your dessert exciting and tailored to your taste preferences.
FAQs
What can I use instead of graham cracker crumbs?
You can substitute graham cracker crumbs with crushed cookies like digestive biscuits or even Oreos for a chocolatey twist. Just ensure they're finely crushed to maintain the texture of the crust.
Why did my cheesecake turn out too thick?
If your cheesecake is too thick, it might be due to overmixing the filling or insufficient whipped cream incorporation. Try adding a bit more heavy cream to lighten the mixture during preparation.
Can I add a different fruit puree?
Absolutely! While strawberries are fantastic, you can use any berry puree, or even other fruits like passion fruit or peached blended until smooth. Just adjust the sweetness if necessary.
What if my crust is too crumbly?
A crumbly crust might be due to not enough butter. Ensure all the crumbs are evenly coated. Adding a tablespoon more melted butter can help bind everything together effectively.
How do I add more flavor to the cheesecake?
For enhanced flavor, consider infusing the cream cheese with citrus zest or a splash of liqueur. This will give your cheesecake a unique twist and additional depth.
What can I do if my cheesecake is too sweet?
If your cheesecake turns out too sweet, consider balancing it with a tangy fruit topping like a sour berry sauce. This contrast will help cut the sweetness while adding flavor.
Conclusion
Creating a no-bake strawberry cheesecake is a delightful way to make a decadent dessert without any hassle. With just a few simple ingredients and a bit of time in the refrigerator, you can serve a stunning treat that is sure to please any crowd.
Whether it’s a family gathering or a get-together with friends, this cheesecake serves as a simple yet impressive option. The creamy texture paired with fresh strawberries makes it a dessert that leaves a lasting impression every time.
Recipe Card
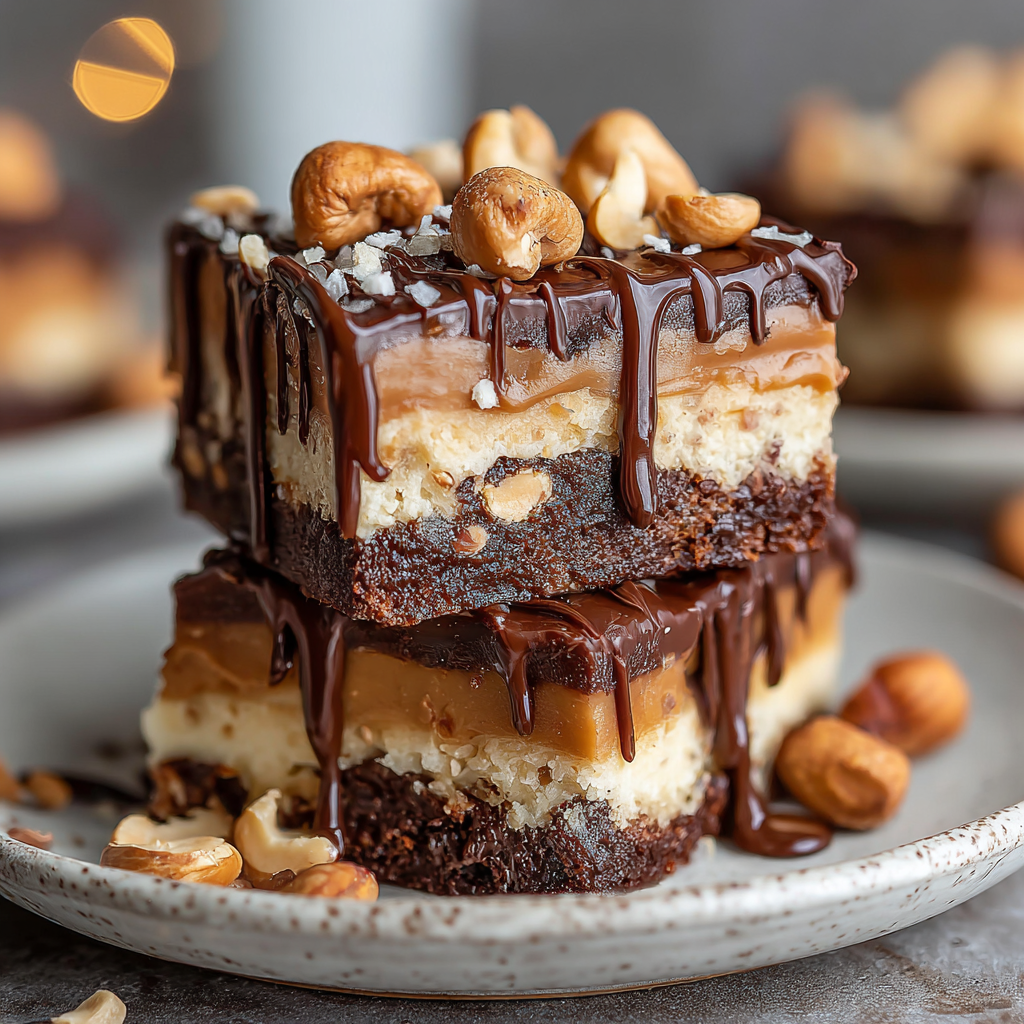
Decadent Chocolate Peanut Butter Dream Bars Recipe
Ingredients
Method
- Preheat your oven to 350°F (175°C) and grease a 9x13 inch baking dish.
- In a bowl, combine graham cracker crumbs, granulated sugar, and melted butter.
- Press the crumb mixture firmly into the bottom of the prepared baking dish.
- In a separate bowl, mix creamy peanut butter and powdered sugar until smooth.
- Spread the peanut butter mixture over the crust evenly.
- In a saucepan, melt the chocolate chips with coconut oil over low heat, stirring constantly until smooth.
- Pour the melted chocolate over the peanut butter layer and spread evenly.
- Chill the bars in the refrigerator for at least 2 hours before slicing.
- Once set, slice the bars into squares and serve.
Notes
Additional serving suggestions: pair with a crisp salad, garlic bread, or roasted seasonal vegetables for balance.
For make-ahead, prep components separately and assemble just before heating to preserve texture.
Taste and adjust with acid (lemon/vinegar) and salt right at the end to wake up flavors.


