Introduction
Peppermint swirl cookies are a festive treat that can bring joy during the holiday season and throughout the year. With their vibrant colors and refreshing mint flavor, these cookies are sure to please any palate. The combination of soft dough and a sweet peppermint twist creates a delightful experience for both the baker and the eater.
The process of making these cookies not only fills your kitchen with a delicious aroma but also offers a chance to share the joys of baking with family or friends. Whether you’re looking to impress guests or simply indulge in a sweet moment, peppermint swirl cookies are a fantastic choice.
Ingredients
- 2 ¾ cups all-purpose flour
Flour is the backbone of the cookie dough. It provides structure and stability to the cookies, ensuring they hold their shape during baking. - 1 tsp baking powder
This leavening agent helps the cookies to rise slightly and achieve a light, tender texture, preventing them from becoming too dense. - ½ tsp salt
Salt enhances the sweetness of the cookies and balances the flavors, ensuring that the mint and sugar don’t overpower the overall taste. - 1 cup unsalted butter, softened
Butter adds richness and a creamy texture to the cookies, contributing to their delightful melt-in-your-mouth quality when baked. - 1 cup granulated sugar
Sugar is essential for sweetness and helps create a slight crispness on the outside of the cookies. It also aids in browning as they bake. - ½ cup brown sugar, packed
Brown sugar introduces moisture and a hint of caramel flavor, adding depth to the cookies while also keeping them chewy. - 1 large egg
Eggs provide moisture, richness, and act as a binder, helping to bring all the ingredients together for a consistent dough. - 1 tsp vanilla extract
Vanilla extract enhances the flavor of the cookies, adding warmth that complements the peppermint and chocolate. - 1 tsp peppermint extract
This extract gives the cookies their signature peppermint flavor, creating that refreshing taste that’s perfect for holiday baking. - ½ cup peppermint candies, crushed
Crushed candies are sprinkled into the dough for added texture and minty flavor, providing a delightful crunch and visual appeal. - Red and green food coloring
Food coloring is used to create the vibrant swirls in the cookie dough, making them visually appealing and festive.
Directions & Preparation
Step 1: Preheat your oven to 350°F (175°C).
Preheating the oven ensures that the cookies bake evenly from the moment they are placed inside. It helps create the right texture, achieving a perfect bake without excessive spread.
Step 2: In a medium bowl, whisk together the flour, baking powder, and salt.
This step is critical for evenly distributing the leaveners and salt throughout the flour. Whisking combines the dry ingredients, ensuring that the cookies won’t have any pockets of baking powder or salt.
Step 3: In a large bowl, cream the softened butter, granulated sugar, and brown sugar until light and fluffy.
Creaming the butter and sugars is essential for incorporating air into the mixture, which contributes to a lighter texture in the final cookies. It also helps to dissolve the sugars, enhancing the overall sweetness.
Step 4: Add the egg, vanilla extract, and peppermint extract, then mix until well combined.
Incorporating liquid ingredients such as the egg and extracts adds moisture and flavor. Mixing until just combined prevents overworking the dough, maintaining a tender cookie.
Step 5: Gradually add the dry flour mixture to the wet ingredients, mixing just until incorporated.
Mixing the dry and wet ingredients together helps build the dough without overworking it. Overmixing can develop gluten, making the cookies tougher rather than soft and chewy.
Step 6: Divide the dough into two equal portions; color one portion with red food coloring and the other with green.
Dividing the dough allows for the creation of the festive swirls. The food coloring gives each half its distinct hue, contributing to the final cookie's visual appeal.
Step 7: Take a spoonful of each color and layer them together, then gently twist to create a swirl effect.
Twisting the colored doughs together is key to achieving that signature peppermint swirl. Be gentle to prevent the colors from blending entirely, which would lead to a less vibrant appearance.
Step 8: Roll the dough into logs about 1 inch in diameter and wrap them in plastic wrap. Chill in the refrigerator for at least 30 minutes.
Chilling the dough firms it up, making it easier to slice into rounds without losing the swirl design. This step also helps to improve the cookie’s texture once baked.
Step 9: Slice the chilled logs into ¼-inch thick rounds and place them on a baking sheet lined with parchment paper.
Slicing the logs evenly ensures uniform baking, allowing all cookies to finish at the same time. Using parchment paper prevents sticking and promotes even browning.
Step 10: Sprinkle the tops with crushed peppermint candies before baking.
Adding crushed peppermint candies prior to baking incorporates an extra texture and bursts of minty flavor with each bite. The candies will slightly melt, adding a visually appealing finish.
Step 11: Bake for 10-12 minutes, or until the edges are lightly golden.
Baking just until the edges begin to turn golden is crucial for achieving a chewy center. Overbaking can dry out the cookies, while underbaking might leave them too soft.
Step 12: Let the cookies cool on the baking sheet for a few minutes before transferring them to a wire rack to cool completely.
Cooling on the baking sheet allows the cookies to firm up slightly before transferring, preventing breakage. The wire rack ensures they cool evenly, maintaining the right texture.

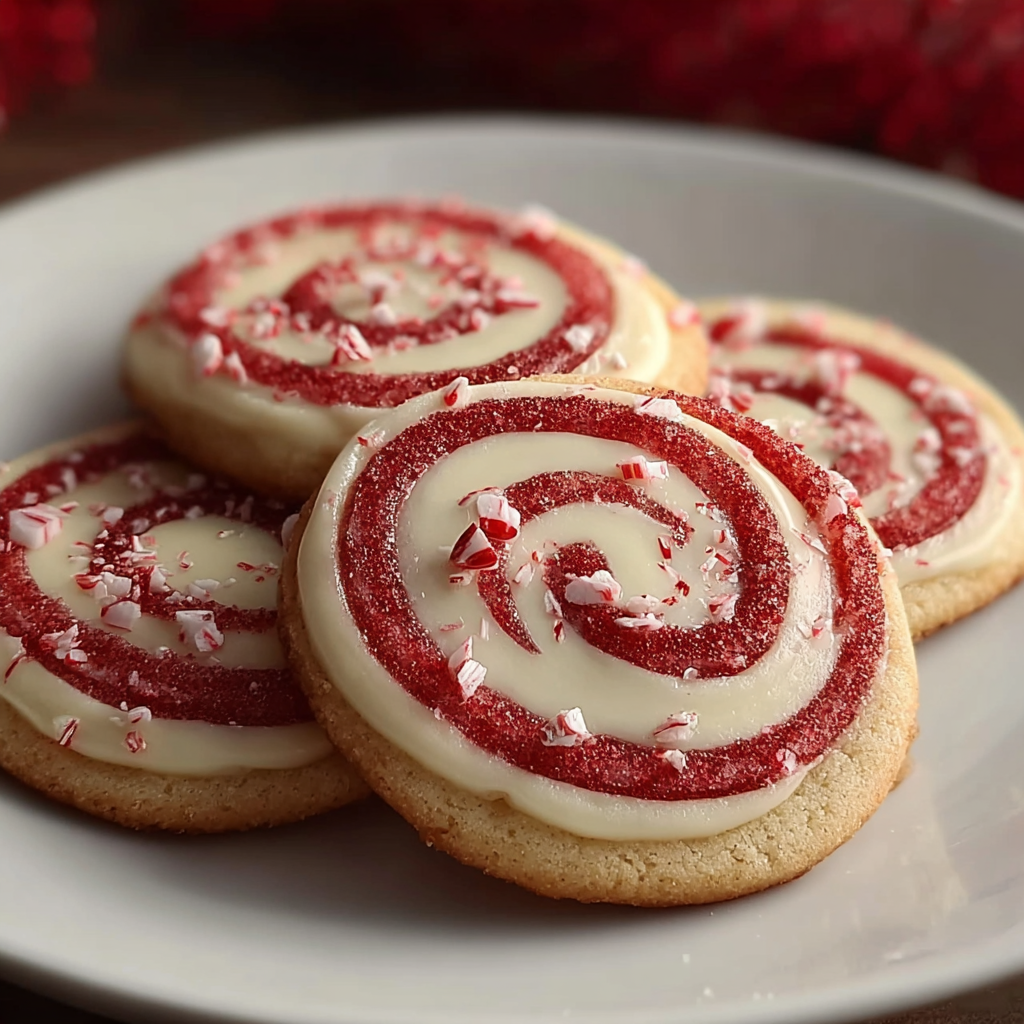
The Art of Swirling Colors
Creating the beautiful peppermint swirls is where the magic happens. A gentle twisting of the colored doughs not only enhances visual appeal but adds to the unique flavor experience. For the best results, ensure the two colors complement each other without over-blending, maintaining distinct swirls that make each cookie a mini work of art.
Peppermint Candy Crunch
Crushed peppermint candies provide not just flavor but also a delightful crunch in every bite. As they melt slightly during baking, they form a sugary coating on the cookie surface, making them irresistibly tasty. Try experimenting with different types of peppermint candies, such as those with chocolate or other flavors for added diversity.
Baking Together: A Family Tradition
Baking peppermint swirl cookies is a great way to spend time with family or friends. Involving loved ones in the process—whether measuring, mixing, or decorating—creates cherished memories. This tradition can bring new generations into the kitchen, fostering an appreciation for baking and the creativity it inspires.
FAQs
What if my dough feels too thick?
If the dough feels too thick to swirl, you can add a tablespoon or two of milk to loosen it up slightly. Ensure to mix just until combined to avoid altering the texture.
Can I adjust the peppermint flavor?
Absolutely! If you prefer a stronger mint flavor, increase the peppermint extract by ¼ teaspoon. Taste test the dough to ensure it suits your preference before baking.
What do I do if my cookies spread too much?
If your cookies spread excessively during baking, it may be due to overly warm dough. Ensure the dough is well-chilled before baking. Alternatively, refrigerate the formed logs longer to solidify them more.
How can I make the cookie dough easier to slice?
If you find the dough difficult to slice after chilling, let it sit at room temperature for a few minutes to soften slightly. A sharp knife also prevents squishing the dough.
Can I use a food processor to mix ingredients?
Yes, using a food processor can speed up the mixing process. Just be cautious not to overmix once you add the flour.
What if my cookies turn out bland?
If the cookies lack flavor, consider adding a pinch more salt or a few extra drops of vanilla or peppermint extract to enhance the taste in future batches.
Conclusion
Peppermint swirl cookies are more than just a treat; they're an expression of creativity and holiday cheer. The simple act of swirling vibrant dough can turn an everyday recipe into a festive masterpiece that delights the senses.
As you share these cookies with friends and family, you not only nourish them but also create lasting memories. Embrace the joy of baking and let these delightful peppermint swirl cookies become a cherished part of your culinary traditions.
Recipe Card

Delightful Peppermint Swirl Cookies for Any Occasion
Ingredients
Method
- Preheat your oven to 350°F (175°C).
- In a medium bowl, whisk together the flour, baking powder, and salt.
- In a large bowl, cream the softened butter, granulated sugar, and brown sugar until light and fluffy.
- Add the egg, vanilla extract, and peppermint extract, then mix until well combined.
- Gradually add the dry flour mixture to the wet ingredients, mixing just until incorporated.
- Divide the dough into two equal portions; color one portion with red food coloring and the other with green.
- Take a spoonful of each color and layer them together, then gently twist to create a swirl effect.
- Roll the dough into logs about 1 inch in diameter and wrap them in plastic wrap. Chill in the refrigerator for at least 30 minutes.
- Slice the chilled logs into ¼-inch thick rounds and place them on a baking sheet lined with parchment paper.
- Sprinkle the tops with crushed peppermint candies before baking.
- Bake for 10-12 minutes, or until the edges are lightly golden.
- Let the cookies cool on the baking sheet for a few minutes before transferring them to a wire rack to cool completely.
Notes
Additional serving suggestions: pair with a crisp salad, garlic bread, or roasted seasonal vegetables for balance.
For make-ahead, prep components separately and assemble just before heating to preserve texture.
Taste and adjust with acid (lemon/vinegar) and salt right at the end to wake up flavors.


