Introduction
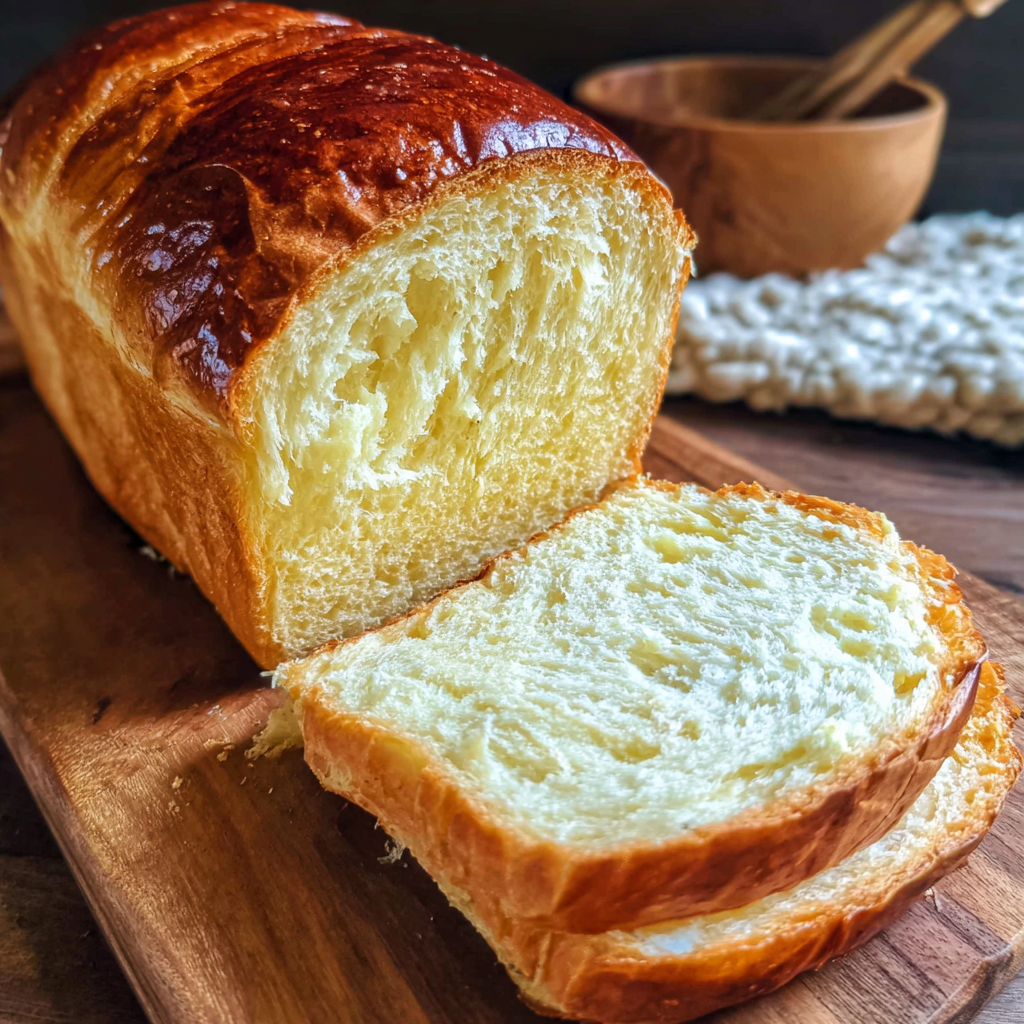
Amish White Bread is more than a simple loaf; it embodies the essence of home-baked goodness. This bread is soft, fluffy, and perfect for sandwiches or toasting. It evokes a sense of nostalgia, much like grandma's kitchen wafting with the scent of freshly baked bread.
Using a handful of simple ingredients, you can create your own homemade bread with ease. The process might take some time, but the reward is a warm, crusty loaf that you can be proud of. Let’s dive into crafting this delightful treat!
Ingredients
- 4 cups all-purpose flour
Flour forms the base of the dough and gives the bread its structure. The gluten in the flour helps to create a chewy texture while allowing the bread to rise. - 1 package (2 1/4 teaspoons) active dry yeast
Yeast is crucial for leavening bread. It ferments the sugars in the dough, releasing carbon dioxide that makes the bread rise and provides a light, airy texture. - 1 1/2 teaspoons salt
Salt enhances the flavor of the bread and controls the fermentation process of the yeast, ensuring a balanced and well-risen loaf. - 1/4 cup granulated sugar
Sugar not only sweetens the bread but also feeds the yeast, promoting a better rise and contributing to the bread’s golden crust. - 1/4 cup unsalted butter, melted
Butter adds richness and moisture to the bread, contributing to a softer texture. It also helps improve the flavor profile. - 1 1/2 cups warm water (110°F)
Warm water activates the yeast, encouraging fermentation. The ideal temperature is crucial; too hot can kill the yeast, while too cold can slow down activation.
Directions & Preparation
Step 1: Activate the yeast.
In a small bowl, combine warm water, sugar, and yeast. Let it sit for about 5-10 minutes until the mixture becomes frothy. This step is essential as it verifies that the yeast is active. If there’s no foam, your yeast may be expired, and you should start over.
Step 2: Mix the dry ingredients.
In a large mixing bowl, whisk together the flour and salt. This ensures that the salt is evenly distributed throughout the flour, which is important for flavor and even rising later on.
Step 3: Combine wet and dry ingredients.
Add the frothy yeast mixture and melted butter to the flour mixture. Stir until a shaggy dough forms. This initial mixing allows for the hydration of the flour and begins the gluten formation process, crucial for structure.
Step 4: Knead the dough.
Turn the dough out onto a floured surface and knead for about 10 minutes until it becomes smooth and elastic. Kneading develops the gluten, which helps the bread rise properly, creating a soft interior.
Step 5: First rise.
Place the kneaded dough in a lightly greased bowl, cover with a damp cloth, and let it rise in a warm place for about 1-2 hours or until it doubles in size. This step is vital for developing flavor and texture as the yeast ferments.
Step 6: Shape the dough.
After the first rise, punch down the dough to release the gas. Divide it into two equal pieces, shape each piece into a loaf, and place in greased bread pans. Proper shaping traps the gases and prepares the dough for a uniform rise.
Step 7: Second rise.
Cover the shaped loaves and let them rise again for about 30-45 minutes until they swell and touch the sides of the pans. This second rise is crucial for achieving a light texture as the yeast continues to work.
Step 8: Preheat the oven.
While the loaves are rising, preheat your oven to 350°F. This ensures that the bread starts baking at the right temperature, helping form a desirable crust while cooking the interior perfectly.
Step 9: Bake the bread.
Place the loaves in the oven and bake for 30-35 minutes. The bread should be golden brown on top and sound hollow when tapped. Proper baking is vital to developing a good crust and ensuring the bread is fully cooked inside.
Step 10: Cool the loaves.
Once baked, remove the bread from the pans and cool on a wire rack. This prevents sogginess on the bottom and allows air to circulate, which is essential for achieving the best texture.

Variations to Spice Up Your Bread
Amish White Bread can be easily customized to suit your taste. Consider adding herbs like rosemary or garlic for a savory twist, or mix in cinnamon and raisins for a sweet treat. Additionally, swapping out a cup of all-purpose flour for whole wheat flour can provide a nuttier flavor, enhancing the complexity of your loaf.
The Science of Yeast Activation
Understanding yeast activation can drastically improve your bread-making experience. When combined with warm water and sugar, yeast microbes begin to feed, multiply, and produce carbon dioxide, causing the dough to rise. This fermentation is essential, so always check the expiration date on your yeast to ensure it’s capable of working its magic.
Storing and Enjoying Your Loaf
To enjoy your freshly baked Amish White Bread at its best, store it in a cool, dry place wrapped in a clean kitchen towel. This keeps it soft while preventing it from becoming stale too quickly. If you find yourself with extra loaves, consider gifting them or using slices for delicious French toast and sandwiches.
FAQs
What should I do if my dough is too sticky?
If your dough is too sticky, gradually add a bit more flour, about a tablespoon at a time, while kneading. However, be careful not to add too much flour, as it can lead to a dense loaf.
Why did my bread not rise properly?
There could be a few reasons for insufficient rising. Ensure your yeast is fresh and that the water was between 100°F and 110°F. If the environment is too cold, try placing the dough in a warmer area to encourage fermentation.
Can I use bread flour instead of all-purpose flour?
Yes, you can use bread flour instead of all-purpose flour. Bread flour has a higher protein content, which can lead to a chewier texture and a better rise, making it appropriate for this recipe.
How can I tell if my bread is fully baked?
To check if your bread is done, you can tap the bottom of the loaf; it should sound hollow. Additionally, the crust should be golden brown, and an instant-read thermometer should read at least 190°F.
What if my bread is too crumbly?
If your bread is crumbly, it may be due to too much flour or not enough hydration during mixing. In the future, ensure you follow the ingredient ratios correctly and knead thoroughly to develop gluten.
Can I add cheese or nuts to the dough?
Absolutely! Adding shredded cheese or chopped nuts can make your Amish White Bread even more flavorful. Incorporate these gently during the mixing stage for best results.
Conclusion
Baking Amish White Bread at home is a rewarding experience that fills your space with warmth and aroma, creating lasting memories. This simple yet delicious recipe transforms basic ingredients into a cherished staple.
As you grow more comfortable with the process, don’t hesitate to experiment with variations and add your personal touch. Enjoy the fruits of your labor with family and friends, relishing in the joy that homemade bread brings.
Recipe Card

Delicious Cauliflower Shawarma Bowls for Every Taste
Ingredients
Method
- Preheat your oven to 425°F (220°C).
- Prepare the cauliflower florets and place them in a large bowl.
- In a separate bowl, whisk together the olive oil, cumin, coriander, smoked paprika, turmeric, salt, and pepper.
- Pour the spice mixture over the cauliflower and toss until evenly coated.
- Spread the cauliflower in a single layer on a baking sheet.
- Roast in the oven for 25-30 minutes, or until golden brown and tender.
- While the cauliflower is roasting, prepare your base, quinoa or bulgur.
- Combine diced tomatoes, cucumber, and red onion in a bowl.
- In a small bowl, whisk tahini and lemon juice until smooth.
- Assemble the bowls with a base of quinoa or bulgur, topped with roasted cauliflower, fresh vegetable mix, and tahini sauce.
- Garnish with chopped parsley before serving.
Notes
Additional serving suggestions: pair with a crisp salad, garlic bread, or roasted seasonal vegetables for balance.
For make-ahead, prep components separately and assemble just before heating to preserve texture.
Taste and adjust with acid (lemon/vinegar) and salt right at the end to wake up flavors.


