
Introduction
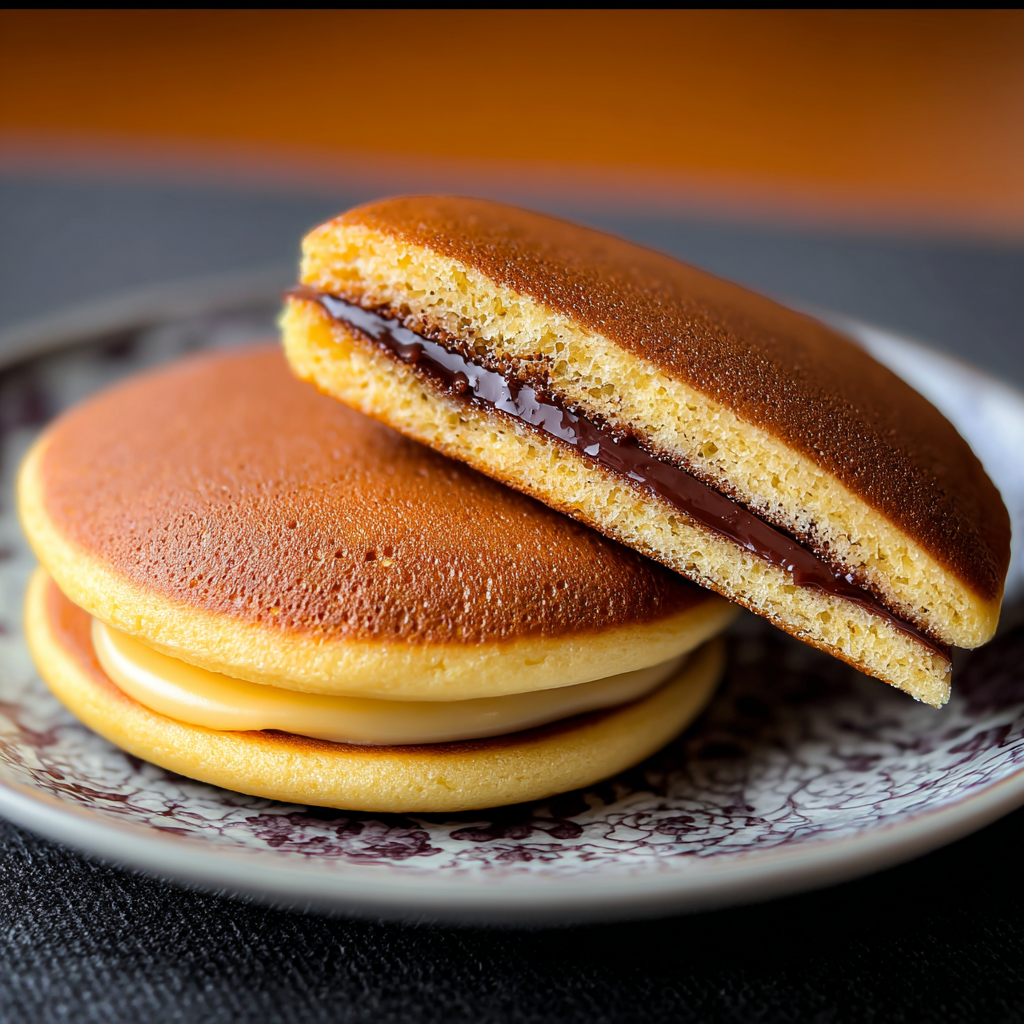
Dorayaki, a beloved confection from Japan, is a delightful treat that combines the fluffiness of pancake-like cakes with the sweetness of red bean paste. Typically enjoyed at tea time, these treats have garnered a special place in the hearts of dessert lovers around the world.
The beauty of dorayaki lies not only in its taste but also in its versatility. While the classic filling is anko, or sweet red bean paste, you can explore countless variations with custards, fruits, or even whipped cream. Whether you want a snack, breakfast, or dessert, dorayaki stands as a sweet option worthy of any occasion.
Ingredients
- 200g all-purpose flour
All-purpose flour provides the structure needed for the dorayaki, contributing to the light, fluffy texture that makes these pancakes so irresistible. Using a finely milled flour helps achieve the right balance of tenderness and chew. - 3 large eggs
Eggs enrich the batter, offering moisture and aiding in the rise during cooking. Their emulsifying properties help to blend the ingredients thoroughly, resulting in a smooth batter that bakes up beautifully. - 100g sugar
Sugar not only sweetens the dorayaki but also helps in browning the cakes when cooked. It aids in creating a slightly crispy exterior while maintaining a soft interior. - 1 tsp baking powder
Baking powder serves as a leavening agent, providing the dorayaki with a light and airy texture. It helps the cakes rise properly as they cook, resulting in a fluffy bite. - 1/2 tsp honey (optional)
Honey adds a slight floral sweetness and moisture, enhancing the overall flavor profile. While optional, it elevates the dorayaki’s texture, giving it an inviting sheen. - 200g sweet red bean paste
Traditionally, dorayaki is filled with anko, or sweet red bean paste. This filling gives dorayaki its signature sweetness and unique flavor, complementing the fluffy outer layers perfectly. - Cooking oil for the pan
A light coating of oil is necessary to prevent the dorayaki from sticking to the pan. It aids in achieving a nice golden-brown color without burning the batter.
Directions & Preparation
Step 1: Prepare the batter by whisking eggs and sugar.
Begin by cracking the eggs into a mixing bowl and adding sugar. Whisk them together until the mixture is smooth and creamy, which usually takes about 2-3 minutes. This step is crucial as it allows the sugar to dissolve properly, ensuring a consistent sweetness throughout the batter. A well-aerated mixture helps in creating a lighter texture when cooked, contributing to the dorayaki's fluffiness.
Step 2: Sift the flour and baking powder together.
In a separate bowl, sift the all-purpose flour along with the baking powder. Sifting is essential as it aerates the flour, ensuring that there are no lumps and that the leavening agent is evenly distributed. This step will yield a smoother batter, which is fundamental for achieving a delicate texture in the finished dorayaki.
Step 3: Combine the dry ingredients with the egg mixture.
Gradually add the sifted flour mixture to the egg and sugar combination. Use a spatula or whisk to carefully fold the flour in until just combined, ensuring not to over-mix. The batter should be thick yet pourable, similar to a pancake batter. Over-mixing can lead to dense dorayaki, so a gentle approach is key.
Step 4: Optional: Fold in honey.
If you're using honey, this is the stage to incorporate it into your batter. Folding it in will enhance the flavor and moisture level of your dorayaki. However, if you prefer a more traditional taste or want a less sweet dessert, you can skip this step.
Step 5: Rest the batter for 30 minutes.
Letting your batter rest is important as it allows the flour to fully hydrate and the gluten to relax, which leads to a more tender pancake. During resting, the flavors meld, and the texture improves, contributing to a better dorayaki experience overall.
Step 6: Heat a non-stick pan and lightly grease it with oil.
Preheat your non-stick pan over medium heat, and add a small amount of oil, spreading it around the surface with a paper towel. A hot pan helps the dorayaki to rise quickly and evenly, while oil prevents sticking. Proper heat control is vital; too hot will cook the outside too fast, leaving the inside raw, while too low will give flat, pale cakes.
Step 7: Pour the batter into the pan and form small rounds.
Using a ladle or measuring cup, pour about 2-3 tablespoons of batter onto the heated pan to form small pancakes. Leave enough space between each pour as the batter will spread slightly. The edges should start to bubble after a few moments; this indicates it's time to flip. Cooking each side for 1.5 to 2 minutes will achieve a lovely golden color.
Step 8: Flip and cook the other side until golden.
Once you see bubbles forming on the surface of the pancake and the edges appear firm, carefully flip it over using a spatula. Cook the other side for another 1.5 to 2 minutes until golden brown. Proper flipping technique will result in even cooking, ensuring both sides are equally fluffy and visually appealing.
Step 9: Remove and fill with red bean paste.
Once each dorayaki is cooked, transfer it to a plate. While the pancakes are still warm, spread a generous layer of sweet red bean paste on the flat side of one pancake and top it with another, pressing gently to secure. It’s essential to fill them while warm as this keeps the cakes soft and pliable, allowing for better blending of flavors.
Step 10: Serve fresh and enjoy your dorayaki.
Dorayaki can be enjoyed immediately or at room temperature. For the best experience, serve them fresh, when the pancakes are warm, and the filling is slightly gooey. You can also dust them with powdered sugar or drizzle with honey for added flair, making them look as delightful as they taste.

Exploring Filling Variations
While sweet red bean paste is the traditional filling for dorayaki, many adaptations have emerged. Consider experimenting with fillings like matcha-infused cream, custard, or even fruits such as strawberries or bananas. These variations not only cater to different tastes but also make dorayaki a versatile dessert suitable for a range of occasions. Each filling brings its own unique flair to this classic treat.
The Art of Flipping Your Dorayaki
Flipping the dorayaki might seem straightforward, but it requires a bit of practice to achieve the perfect golden-brown finish. Ensure the pan is at the right temperature and use a thin spatula for lifting. Flip gently, as a sudden movement may cause the pancake to break. With a little patience and practice, you'll master the technique, providing a consistent shape and texture that makes your dorayaki visually appealing.
Serving Suggestions for Your Treats
Dorayaki is not just a dessert; it can be a delightful accompaniment to tea or coffee. Pair them with a warm cup of green tea for a traditional touch or with your favorite brewed coffee for an Western modern twist. Presentation matters, too; stack them on a decorative plate and dust with powdered sugar, or drizzle with chocolate sauce to impress guests and elevate your dessert experience.
FAQs
What if my dorayaki are too thick or thin?
If the batter is too thick, you can add a little milk or water to reach your desired consistency. On the other hand, if it's too thin, add a small amount of flour to thicken it. A thick batter yields fluffier pancakes.
Why did my dorayaki turn out bland?
Ensure you measure the sugar correctly, as this is key to flavor. If you prefer a richer taste, try adding a pinch of salt or vanilla extract to elevate the sweetness and enhance the overall flavor profile.
What can I substitute for red bean paste?
You can substitute red bean paste with other fillings like Nutella, fruit preserves, or whipped cream, depending on your taste preference. Just ensure the filling is sweet to complement the dorayaki.
Why are my dorayaki overcooked?
Overcooking can occur if the pan is too hot or if you leave them on too long. Use medium heat and keep an eye on them; the perfect dorayaki will cook quickly while staying fluffy.
Can I add flavors to my dorayaki batter?
Absolutely! Flavors like matcha, vanilla, or citrus zest can be incorporated into the batter for a unique twist. Just ensure that any additional ingredients do not overly dilute the batter.
What's the texture supposed to be like?
The ideal dorayaki is soft, fluffy, and slightly chewy. If your dorayaki are dense, it may be due to over-mixing the batter or using too much flour.
Conclusion
Japanese dorayaki is a delightful and versatile treat that brings a taste of Japan into your kitchen. With its soft pancakes and sweet filling, each bite delivers comfort and joy. The beauty of these treats lies in their adaptability, so don’t shy away from making your own unique variations.
With a bit of practice, you can master the art of dorayaki, impressing your family and friends with your skills. Enjoy the process, and savor every bite, knowing you've crafted something truly special.
Recipe Card
The Delightful Charm of Japanese Dorayaki
Ingredients
Method
- Prepare the batter by whisking eggs and sugar.
- Sift the flour and baking powder together.
- Combine the dry ingredients with the egg mixture.
- Optional: Fold in honey.
- Rest the batter for 30 minutes.
- Heat a non-stick pan and lightly grease it with oil.
- Pour the batter into the pan and form small rounds.
- Flip and cook the other side until golden.
- Remove and fill with red bean paste.
- Serve fresh and enjoy your dorayaki.
Notes
Additional serving suggestions: pair with a crisp salad, garlic bread, or roasted seasonal vegetables for balance.
For make-ahead, prep components separately and assemble just before heating to preserve texture.
Taste and adjust with acid (lemon/vinegar) and salt right at the end to wake up flavors.


